
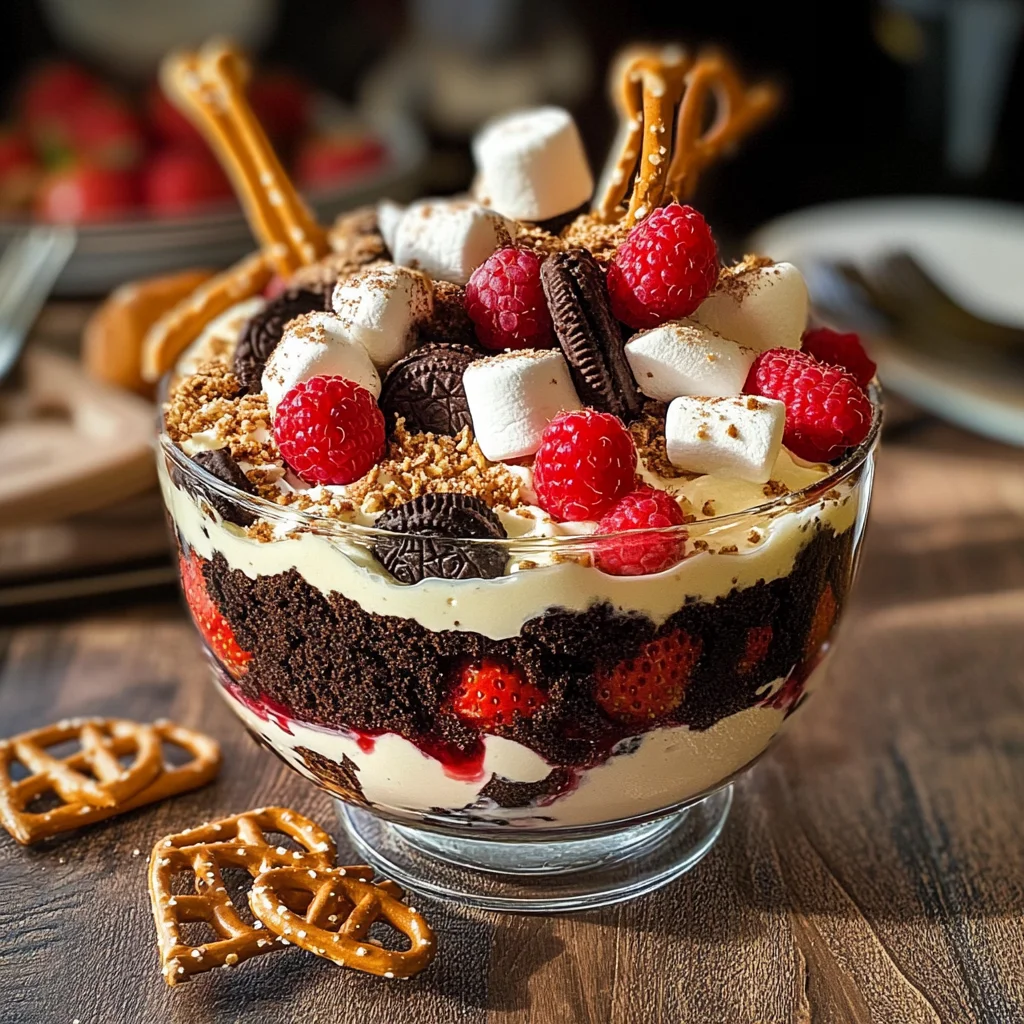
Wild Forest Classic Dirt Pudding Cake is a delightful dessert that brings the charm of nature right to your table. This fun and whimsical cake combines layers of rich chocolatey flavors with a creamy, dreamy texture. Perfect for birthdays, picnics, or any gathering, it appeals to both kids and adults alike. With fresh strawberries and raspberries adding a burst of color and flavor, this cake stands out in any dessert spread.
Why You’ll Love This Recipe
- Easy to Make: With simple ingredients and straightforward steps, you can whip this up in no time.
- Delicious Layers: The combination of creamy pudding and crushed Oreo cookies creates a texture that everyone loves.
- Customizable Toppings: Feel free to add your favorite fruits or sprinkles for extra flair.
- Perfect for Any Occasion: Whether it’s a birthday party or a cozy family dinner, this dessert fits right in.
- Visually Stunning: The earthy tones and colorful toppings make it a feast for the eyes as well!
Tools and Preparation
To create your Wild Forest Classic Dirt Pudding Cake, you’ll need some essential tools. Having the right equipment can simplify the process and ensure excellent results.
Essential Tools and Equipment
- Mixing bowls
- Hand mixer or stand mixer
- Food processor or rolling pin
- Rubber spatula
- Measuring cups and spoons
- Serving dish (trifle dish or 9×13 dish)
Importance of Each Tool
- Mixing Bowls: Essential for combining ingredients without making a mess.
- Hand Mixer or Stand Mixer: Helps achieve fluffy whipped cream and smooth cream cheese mixture quickly.
- Food Processor: Makes crushing Oreo cookies effortless, saving you time.
- Rubber Spatula: Perfect for folding ingredients together gently without losing air.

Ingredients
For the Cake Base
- 14 oz package of Oreos
For the Creamy Filling
- 8 oz cream cheese (softened)
- 3 & 1/2 cups cold whole milk
- 2 (3.4 oz) boxes French vanilla pudding (or plain vanilla/chocolate)
- 1 cup heavy whipping cream (or Cool Whip)
- 3/4 cup powdered sugar
- 1 tsp vanilla extract (or vanilla bean)
For the Toppings
- 1 lb fresh strawberries
- 1/4-1/2 cup fresh raspberries
- Pretzel sticks
- Mini vegan marshmallows
For Decoration
- 4-6 oz white chocolate
- 2 tsp coconut oil (for melting)
- Crushed pistachios for moss
How to Make Wild Forest Classic Dirt Pudding Cake
Step 1: Make the Pudding & Crush Oreos
- In a large bowl, whisk together the cold milk and instant pudding mix until well combined. Set aside to thicken.
- Place the entire package of Oreos into a food processor and pulse until you have coarse crumbs. Alternatively, seal them in a large ziplock bag and crush them using a rolling pin.
Step 2: Make the Whipped Cream
- Using either a hand mixer or stand mixer with a whisk attachment, whip the heavy cream until soft peaks form.
- Fold in the vanilla extract gently to incorporate.
Step 3: Whip Cream Cheese & Finish Pudding
- In your stand mixer bowl, beat the softened cream cheese until creamy.
- Add powdered sugar to the cream cheese and mix until smooth.
- Incorporate the thickened pudding into the cream cheese mixture on medium speed until fully combined.
- Gently fold in your whipped cream using a rubber spatula until blended.
Step 4: Assemble Dirt Cake
- Choose your serving dish—an 8 or 9-inch round dish, 9×13 dish, trifle dish, or small mugs will work well.
- Start by adding one layer of crushed Oreos, followed by a layer of the creamy filling.
- Repeat these layers until you fill your dish to the top, finishing with a layer of crushed Oreos.
Now you’re all set to enjoy this nature-inspired dessert!
How to Serve Wild Forest Classic Dirt Pudding Cake
Serving the Wild Forest Classic Dirt Pudding Cake is a delightful experience that can elevate any gathering. This dessert not only looks stunning but also tastes amazing, making it a perfect centerpiece for your table.
Individual Serving Cups
- Use small cups or jars to layer the dirt pudding. This creates a fun and personal touch for each guest.
Garden Party Presentation
- Decorate the top with edible flowers and mint leaves to enhance the garden theme. This adds freshness and color to your presentation.
Family-Style Platter
- Serve in a large trifle bowl or clear dish for a communal dessert option. Guests can scoop their own portions, making it interactive.
Themed Dessert Table
- Incorporate nature-themed decorations such as mini figurines of woodland creatures or faux foliage around the dessert. This adds a whimsical feel to your event.
How to Perfect Wild Forest Classic Dirt Pudding Cake
To achieve the best version of Wild Forest Classic Dirt Pudding Cake, follow these expert tips for a delicious result.
- Use Quality Ingredients – Select fresh strawberries and high-quality Oreos for better flavor and texture.
- Layer Carefully – Ensure each layer is evenly distributed for balanced flavors in every bite.
- Chill Before Serving – Allow the cake to chill for at least an hour before serving. This helps flavors meld together.
- Customize Toppings – Feel free to add different fruits or nuts on top according to your preference, creating variations that suit your taste.
- Make Ahead – Prepare this dessert a day in advance. The flavors deepen overnight, enhancing the overall taste.
- Experiment with Flavors – Try using chocolate pudding instead of vanilla for a rich twist on this classic recipe.
Best Side Dishes for Wild Forest Classic Dirt Pudding Cake
Pairing side dishes with your Wild Forest Classic Dirt Pudding Cake can create a well-rounded meal that excites the palate. Here are some great options:
- Fresh Fruit Salad – A mix of seasonal fruits adds brightness and complements the sweetness of the cake.
- Vanilla Ice Cream – Serve alongside for those who enjoy an extra creamy treat with their dessert.
- Chocolate Chip Cookies – These provide a crunchy contrast to the soft pudding layers.
- Nutty Granola Bars – A healthy option that gives a satisfying crunch alongside the rich cake.
- Coconut Macaroons – These chewy treats harmonize well with the pudding’s creaminess.
- Cheese Platter – Offer a selection of mild cheeses that balance out the sweetness of the dirt pudding cake.
- Herb-Infused Water – A refreshing drink option; infuse water with herbs like mint or basil for an aromatic experience.
- Savory Crackers – These can provide an interesting texture contrast while cleansing the palate between bites of dessert.
Common Mistakes to Avoid
Making the Wild Forest Classic Dirt Pudding Cake can be a joy, but there are some common pitfalls to watch out for.
- Skipping the Whipping Step: If you skip whipping the cream, your cake may end up dense. Always whip until soft peaks form for a light texture.
- Using Warm Ingredients: Ensure that your cream cheese is softened but not warm. Warm ingredients can affect the consistency and flavor of the cake.
- Not Letting the Pudding Set: Allowing the pudding to set properly is crucial. This step ensures that your cake layers hold together when served.
- Overmixing: Mixing too much after adding whipped cream can deflate it. Gently fold in whipped cream to maintain that airy texture.
- Ignoring Layering: Proper layering is key for presentation and taste. Be sure to alternate layers of oreos and filling evenly for a balanced flavor.
Storage & Reheating Instructions
Refrigerator Storage
- Store in an airtight container for up to 3 days.
- Keep covered with plastic wrap or a lid to prevent drying out.
Freezing Wild Forest Classic Dirt Pudding Cake
- Freeze for up to 2 months in a tightly sealed container.
- Thaw in the refrigerator overnight before serving.
Reheating Wild Forest Classic Dirt Pudding Cake
- Oven: Preheat to 350°F. Cover with foil and heat for about 10-15 minutes until just warmed through.
- Microwave: Heat individual servings on medium power for 20-30 seconds, checking frequently to avoid overheating.
- Stovetop: Place in a non-stick pan over low heat, stirring gently until warmed.
Frequently Asked Questions
If you have any questions about making or storing this delicious dessert, you’re in the right place!
What is Wild Forest Classic Dirt Pudding Cake?
Wild Forest Classic Dirt Pudding Cake is a delightful layered dessert made with crushed oreos, creamy vanilla pudding, and fresh berries.
Can I customize my Wild Forest Classic Dirt Pudding Cake?
Absolutely! You can swap out fruits or add different toppings like crushed nuts or edible flowers for a unique twist.
How long does Wild Forest Classic Dirt Pudding Cake last?
When stored properly, this cake lasts up to three days in the refrigerator and two months in the freezer.
What alternative ingredients can I use?
You can replace heavy whipping cream with cool whip or use non-dairy alternatives as well. Experiment with different flavors of pudding too!
Final Thoughts
The Wild Forest Classic Dirt Pudding Cake is a charming dessert that brings joy to any gathering. Its versatility allows you to customize with various fruits and toppings, making it perfect for any occasion. Don’t hesitate to try this recipe; your friends and family will love it!
Wild Forest Classic Dirt Pudding Cake

Indulge in the delightful experience of Wild Forest Classic Dirt Pudding Cake, a whimsical dessert that captures the essence of nature with its rich layers of creamy pudding and crunchy cookie crumbs. This no-bake treat is perfect for any occasion, from birthdays to family gatherings, appealing to both kids and adults alike. Bursting with fresh strawberries and raspberries, this cake not only tastes amazing but also serves as a stunning centerpiece for your dessert table. With its easy preparation and customizable toppings, you can create a unique dessert that everyone will love.
- Prep Time: 20 minutes
- Cook Time: None
- Total Time: 0 hours
- Yield: Serves approximately 12 1x
- Category: Dessert
- Method: No-Bake
- Cuisine: American
Ingredients
- 14 oz package of Oreos
- 8 oz cream cheese (softened)
- 3 & 1/2 cups cold whole milk
- 2 (3.4 oz) boxes vanilla pudding
- 1 cup heavy whipping cream
- 3/4 cup powdered sugar
- 1 tsp vanilla extract
- 1 lb fresh strawberries
- 1/4–1/2 cup fresh raspberries
- Pretzel sticks for decoration
Instructions
- In a large bowl, whisk cold milk and pudding mix until thickened. Set aside.
- Crush Oreos in a food processor or ziplock bag until coarse crumbs form.
- Whip heavy cream until soft peaks form; gently fold in the vanilla extract.
- Beat softened cream cheese until smooth, add powdered sugar, then mix in the thickened pudding.
- Fold in whipped cream until well combined.
- In your serving dish, layer crushed Oreos and creamy filling alternately, finishing with Oreos on top.
Nutrition
- Serving Size: 1/12 of cake (approximately 110g)
- Calories: 290
- Sugar: 24g
- Sodium: 210mg
- Fat: 16g
- Saturated Fat: 9g
- Unsaturated Fat: 6g
- Trans Fat: 0g
- Carbohydrates: 32g
- Fiber: 2g
- Protein: 4g
- Cholesterol: 40mg

Leave a Comment